General Instructions for template building and installation
This becomes important when…. your gate opening is not square, the fence post is crooked for instance. You can measure a square/rectangular opening side to side and top to bottom with a tape measure but that doesn’t tell me if the opening is square. Measure corner to corner diagonally like a big X shape both these measurements will be equal if the opening is square. I don’t worry about 1/4 of an inch (or less) difference in length if the gap between the post and gate is 2″ inches wide. There is usually a gap to allow for the hinge swing and spacing on the latch side.
To build a template you will build a square frame right into the wall opening….no measuring needed in that case because you are going to bring me a replica of the opening. You will need to add corner gussets so the frame is rigid. Be sure to mark both sides, I need to know which side faces into the 2nd floor room. This is the face that you will see close up. Indicate up and down on the frame so that I can orient the design. It is great to have a helper to hold the wood in place as the frame is being built.
You can attach the panel with 4″ lag bolts. Lag bolts are not pretty so I will make a set of 4 sleeves at 2″, and two extra that are longer in case it turns out you need to cut a longer sleeve. You can cut these to length with a hack saw. You will need to block up the panel 2″ (or whatever gap size you prefer) so that it sits parallel to the lower ledge and you have the 2″ spacing. You will then mark the holes to pilot drill in to order easily hand tighten the lag screw in the 2 X 4 frame under the sheet rock, and so that you don’t split the 2 X 4n with all the pressure of a large lag screw.
Pilot Drilling a hole for a lag screw means: You look at the shank of the lag screw (not the threads that stick out and spiral down). and you pick out a drill bit that is slightly smaller than the shank. The threads still cut into wood as you screw in the lag bolt, so it is strong.
You then put the spacer between the wall and the frame and you thread a bolt thru a hole in the frame thru the spacer into the 2″ X 4″ under the sheetrock wall
Notice that in the attached sketch # 1 that the triangle gussets are in different positions on the frame, that is fine the most important thing is the outside of the frame, that is what I will be building off of. Just make sure the template is rigid and braced enough that it won’t move as I build off it. You could just use a piece of the 2″ wood but a triangle is a bit easier to work with cause there is more surface area to screw into.
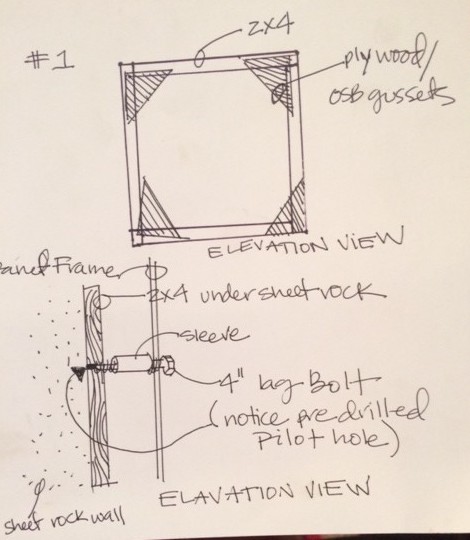
The first sketch is looking at the template head on..2nd sketch is looking at it sideways as if you could see through the wall and see the template from the side attached to the wall.
Recent Comments